

Creating an API using Kaggle dataset in FastAPI
Additional features would include pagination and rate limit


FastAPI is a web framework in Python used to quickly create production level APIs. It is the third most popular back-end development framework in Python behind Django and Flask but quickly gaining popularity in the development community. It currently has 50K+ stars on Github.
In this post we would be creating an API using a sample dataset from Kaggle. We would be using Postgres, SQLAlchemy, pandas, Postman and FastAPI to develop this. To start with we would setup a virtual environment and activate it. Create a requirements.txt file in the root directory of your project and paste the following contents. We would be using these packages for API development
alembic==1.8.1
anyio==3.6.2
click==8.1.3
colorama==0.4.5
fastapi==0.85.1
fastapi-pagination==0.10.0
greenlet==1.1.3.post0
h11==0.14.0
idna==3.4
importlib-metadata==5.0.0
importlib-resources==5.10.0
Mako==1.2.3
MarkupSafe==2.1.1
numpy==1.23.4
pandas==1.5.1
psycopg2==2.9.4
pydantic==1.10.2
python-dateutil==2.8.2
python-multipart==0.0.5
pytz==2022.5
six==1.16.0
sniffio==1.3.0
SQLAlchemy==1.4.42
starlette==0.20.4
typing-extensions==4.4.0
uvicorn==0.19.0
zipp==3.9.0
Next obvious step is to install these packages. After this is done, we would look for our dataset on Kaggle which we would use for populating data. I'd be using this dataset https://www.kaggle.com/datasets/shiddharthsaran/dragon-ball-dataset. The dataset contains character names and data from the Dragonball Z universe, a very popular Japanese anime.
We would perform some analysis and data cleaning on the dataset if required. For instance, we would like to avoid presence of null values in any of the columns in our dataset. If present, we would like them to replace with suitable values. Data cleaning would be done using pandas library. Luckily, in the dataset we have we do not need to clean the data as there are no null values available. To verify this, let us create a folder called 'data', inside of this we would extract the achieved dataset and rename it to 'data.csv'. Let's us check the presence of null values across all the columns in the dataset.
import pandas as pd
import numpy as np

df = pd.read_csv('data/data.csv')

print(df.isnull().sum())
Once we execute this program, you'd notice all columns would have 0 value which means there are no null entries which makes our life a bit easier. Next, we would work on setting the database and models. Create a file called 'config.py' and paste the following snippet.
DATABASE_USERNAME = 'postgres'
DATABASE_PASSWORD = 'pass12345'
DATABASE_HOST = '127.0.0.1'
DATABASE_NAME = 'dbz-api'
This file would hold database variables. I assume you have Postgres and PgAdmin installed, if not you would be required to install those before reading further. Open the PgAdmin tool and create a database called 'dbz-api'. Now create a 'db.py' file with the following contents.
from sqlalchemy import create_engine, MetaData
from sqlalchemy.ext.declarative import declarative_base
from sqlalchemy.orm import sessionmaker

import config

DATABASE_USERNAME = config.DATABASE_USERNAME
DATABASE_PASSWORD = config.DATABASE_PASSWORD
DATABASE_HOST = config.DATABASE_HOST
DATABASE_NAME = config.DATABASE_NAME

SQLALCHEMY_DATABASE_URL = f"postgresql://{DATABASE_USERNAME}:{DATABASE_PASSWORD}@{DATABASE_HOST}/{DATABASE_NAME}"

engine = create_engine(SQLALCHEMY_DATABASE_URL)

SessionLocal = sessionmaker(autocommit=False, autoflush=False, bind=engine)

Base = declarative_base()
metadata = MetaData()

def get_db():
    db = SessionLocal()
    try:
        yield db
    finally:
        db.close()
This is the standard file we use for creating database engine, session and meta-data using SQLAlchemy in FastAPI applications. We would next work on creating models and schemas for our database tables. We would get to know column names through data analysis we performed earlier. In this dataset, we have four columns named Character, Power_Level, Saga_or_Movie and Dragon_Ball_Series. We would design our column names of our model accordingly. Let us create a folder named 'api' Create four files inside this folder - models.py, router.py, schema.py, and services.py. Open models.py file and save the given snippet.
from sqlalchemy import Column, String, Integer

from db import Base

class ApiData(Base):
    __tablename__ = "api_data"

    id = Column(Integer, primary_key=True, autoincrement=True)
    character = Column(String(100))
    power_level = Column(String(100))
    saga_or_movie = Column(String(100))
    dragon_ball_series = Column(String(100))
In this file we have defined column names and their data type based on data analysis of our dataset. Open the schema.py file in your favorite editor and paste the following code.
from typing import Optional, List
from pydantic import BaseModel, constr

class ApiDataBase(BaseModel):
    id: Optional[int]
    character: str
    power_level: str

    class Config:
        orm_mode = True
This is similar to serialization in Django, we are defining the fields of the model we want in our API request. Often, you would want a subset of the columns defined in your model. Here, we've skipped showing saga_or_movie and dragon_ball_series fields in the table, but those can be easily added in the schema. Now that we have the schema ready, it is time to automatically create tables in the database which we connected earlier using alembic. Create a migrations folder by typing the following command in the terminal.
alembic init alembic
This would create a migrations folder inside the project named 'alambic'. Inside this you would find an env file. We would open this file and make changes to it by importing our models and database configuration. We would also add support for automatic table creation through meta data.
from logging.config import fileConfig

from sqlalchemy import engine_from_config
from sqlalchemy import pool
import config as dbConfig

from alembic import context
from db import Base

from api.models import ApiData

# this is the Alembic Config object, which provides
# access to the values within the .ini file in use.
config = context.config

# Interpret the config file for Python logging.
# This line sets up loggers basically.
fileConfig(config.config_file_name)

# add your model's MetaData object here
# for 'autogenerate' support
# from myapp import mymodel
# target_metadata = mymodel.Base.metadata
target_metadata = Base.metadata

# other values from the config, defined by the needs of env.py,
# can be acquired:
# my_important_option = config.get_main_option("my_important_option")
# ... etc.

def get_url():
    db_user = dbConfig.DATABASE_USERNAME
    db_password = dbConfig.DATABASE_PASSWORD
    db_host = dbConfig.DATABASE_HOST
    db_name = dbConfig.DATABASE_NAME
    return f"postgresql://{db_user}:{db_password}@{db_host}/{db_name}"

def run_migrations_offline():
    """Run migrations in 'offline' mode.

    This configures the context with just a URL
    and not an Engine, though an Engine is acceptable
    here as well.  By skipping the Engine creation
    we don't even need a DBAPI to be available.

    Calls to context.execute() here emit the given string to the
    script output.

    """
    url = get_url()
    context.configure(
        url=url,
        target_metadata=target_metadata,
        literal_binds=True,
        dialect_opts={"paramstyle": "named"},
    )

    with context.begin_transaction():
        context.run_migrations()


def run_migrations_online():
    """Run migrations in 'online' mode.

    In this scenario we need to create an Engine
    and associate a connection with the context.

    """
    configuration = config.get_section(config.config_ini_section)
    configuration["sqlalchemy.url"] = get_url()
    connectable = engine_from_config(
        configuration, prefix="sqlalchemy.", poolclass=pool.NullPool,
    )

    with connectable.connect() as connection:
        context.configure(
            connection=connection, target_metadata=target_metadata
        )

        with context.begin_transaction():
            context.run_migrations()

if context.is_offline_mode():
    run_migrations_offline()
else:
    run_migrations_online()
Once done with this step, we are ready to generate migrations and apply them. Type following two commands in sequence.
alembic revision --autogenerate -m "Added api data table"
alembic upgrade head
The first command generates the migration files and entries while the second one applies this which creates the actual tables. We would now revisit 'api' folder and work on creating routes and services for our app. Open 'routes.py' file and paste the following code. We would walk through it in a moment.
from typing import List
from fastapi import APIRouter, Depends, status, Response, Request
from sqlalchemy.orm import Session
from .models import ApiData
import pandas as pd
from typing import List
from . schema import ApiDataBase
from fastapi_pagination import Page, add_pagination, paginate, Params

import db

from .import services

router = APIRouter(
    tags=["DBZ"],
    prefix='/api'
)


@router.get('/', status_code=status.HTTP_200_OK, response_model=Page[ApiDataBase])
async def api_data(params: Params = Depends(), database: Session = Depends(db.get_db)):
    result = services.get_api_data(database)
    return paginate(result, params)


@router.post('/populate', status_code=status.HTTP_201_CREATED)
async def create_api_data(database: Session = Depends(db.get_db)):
    df = pd.read_csv('data/data.csv')
    for index, data in df.iterrows():
        result = services.create_new_data(data['Character'], data['Power_Level'], data['Saga_or_Movie'], data['Dragon_Ball_Series'], database)
    return {
        'message': 'Data populated successfully'
    }
This is the finalized version of the routes.py file. We have prefixed this router module with '/api'. All the routes defined would be accessible through localhost:8000/api?page=2&size=20. We have added pagination using this package https://github.com/uriyyo/fastapi-pagination. We would write functions to get data from the database and pass it to route handlers inside 'services.py' file
from fastapi import HTTPException, status
from typing import List
from .models import ApiData

def create_new_data(character, power_level, saga_or_movie, dragon_ball_series, database) -> ApiData:

    new_data = ApiData(character=character,
                        power_level=power_level,
                        saga_or_movie=saga_or_movie,
                        dragon_ball_series=dragon_ball_series)
    database.add(new_data)
    database.commit()
    database.refresh(new_data)
    return new_data


def get_api_data(database):
    data = database.query(ApiData).all()
    return data
To populate the data from the csv file we have created a end-point called '/populate'. We would hit this API with a post request which would trigger csv file read and for each row a database entry would be added. Reading data would be done through pandas functions. Column data fields would be passed on to create_new_data function defined inside services.py file which would ultimately create entries in the database and commit the results. We can delete this function once done with populating database table since it's only required once in our case.
Let us now take a moment to talk more about the GET request we have for our data.
@router.get('/', status_code=status.HTTP_200_OK, response_model=Page[ApiDataBase])
async def api_data(params: Params = Depends(), database: Session = Depends(db.get_db)):
    result = services.get_api_data(database)
    return paginate(result, params)
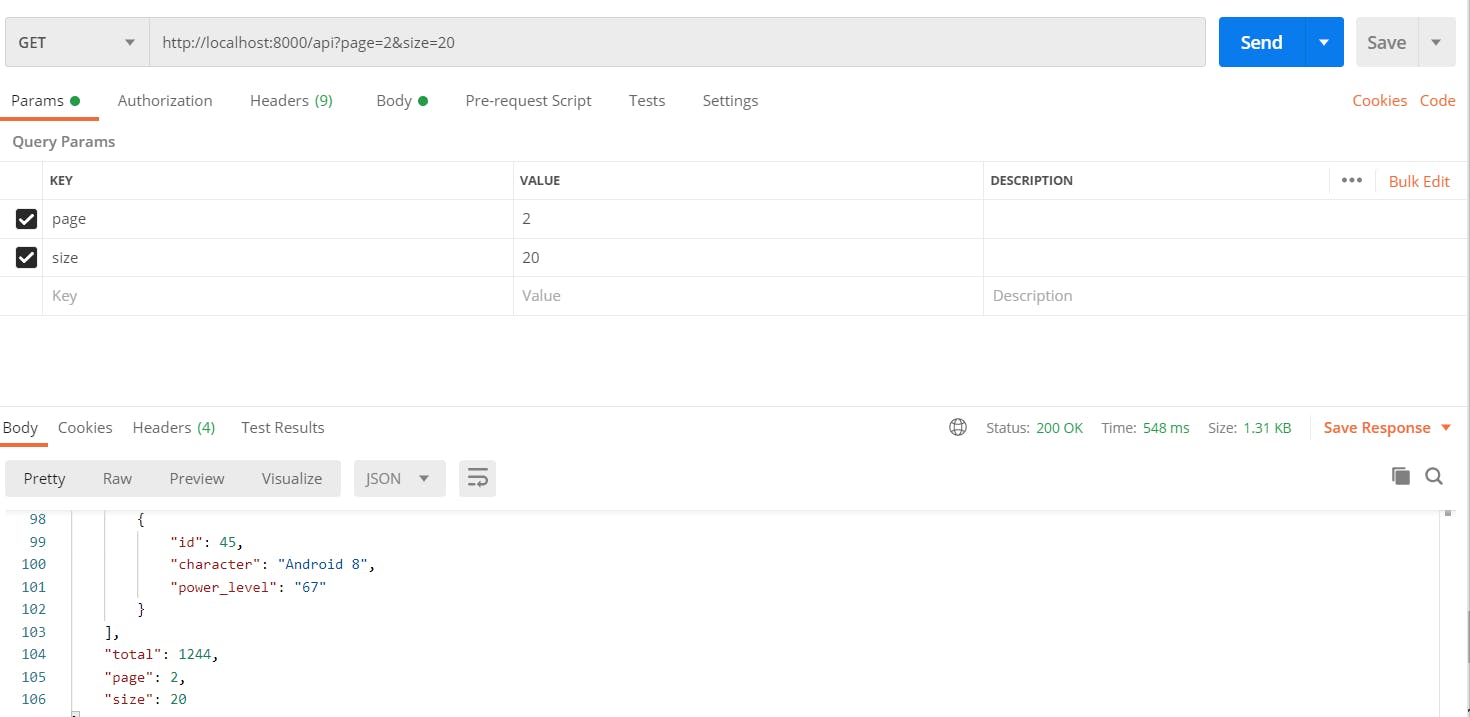
For more information on pagination please refer to the Github page of the package we used for implementing pagination - github.com/uriyyo/fastapi-pagination Basically, it would return a Page instance as response model which would process 'page' and 'size' provided as url params and would return number of items based on values passed. In the given image below I've tested the GET end-point with pagination params passed.
Time to create our 'main.py' file import this module into it. This main file would be responsible for running the FastAPI application using the uvicorn server on localhost.
from fastapi import FastAPI, Request
import uvicorn
from api import router as api_router

import db

app = FastAPI(title="DBZ API",
    docs_url="/docs",
    version="0.0.1")

@app.get("/")
async def main(request: Request):
    return {
        'message': 'DBZ API'
    }

app.include_router(api_router.router)

if __name__ == "__main__":
    uvicorn.run(app, host="0.0.0.0", port=8000)
With this we are ready with our API. This should be accessible on port 8000 on your localhost. FAST API has support for automatic docs which you can access by hitting '/docs' url we specified in the settings. It is time to conclude this blog post with this. Please post in the comments for any queries you have. Thanks for the read.